LaserCutter: Difference between revisions
remove ETA |
update status Tags: Manual revert Visual edit |
||
| (41 intermediate revisions by 9 users not shown) | |||
| Line 1: | Line 1: | ||
{{AttentionBox | {{AttentionBox | ||
| title=Dangerous machine ahead | | title=Dangerous machine ahead | ||
| msg= Use only at your own risk | | msg= Use only at your own risk. Taking a laser introduction course is mandatory to use this machine. | ||
}} | }} | ||
{{ThingInfoBox | {{ThingInfoBox | ||
|name = LaserCutter | |name = LaserCutter | ||
|status = | |status = working | ||
|image = Lasercutter01.jpg | |image = Lasercutter01.jpg | ||
|description = A Laser to cut stuff | |description = A Laser to cut stuff | ||
| Line 16: | Line 12: | ||
}} | }} | ||
Laser cutters are an excellent tool for cutting and engraving wood and acrylic glass. To get started, you will need a vector file (bought online or created by yourself in Inkscape/illustrator) and laser-safe material. This page will give you an overview of the laser cutter, safety information, and instruction on how to use it. Before using it, you must complete a machine introduction course. | |||
== Current Status == | == Current Status == | ||
| Line 28: | Line 21: | ||
* Big build area (Table Size: 1240 x 1000 mm / max Cutting Size: 1140 x 800 mm) | * Big build area (Table Size: 1240 x 1000 mm / max Cutting Size: 1140 x 800 mm) | ||
* Pilot laser for dry run and positioning | * Pilot laser for dry run and positioning | ||
* 90W CO2 | * 90W CO2, wavelength ≈ 10 microns | ||
== Components / Parts == | == Components / Parts == | ||
* | * Trocen AWC7824 Controller Laser Engraving Cutting Controller | ||
* Reci 90W CO2 Laser Tube | * Reci 90W CO2 Laser Tube | ||
* DY13 100W Laser PSU | * DY13 100W Laser PSU | ||
* OpenLaserSafety v1.0 | |||
* Exhaust System including filters | |||
* Air pump (for Nozzle) | |||
== Safety == | |||
[[File:Lasercutter-safety-switches.jpg|right|400px]] | |||
== | Laser cutters are dangerous in various aspects. There is an invisible laser beam that can permanently damage your eye. The fumes that escape while laser-cutting or engraving materials are at least unhealthy, in some cases toxic and worst case can cause severe health issues when inhaled. There is also a chance of starting a fire if operated incorrectly. | ||
[[File: | |||
* Undergoing a training course is mandatory before you start using the laser. | |||
* Do not tamper or work around any safety measures, including the machine activation and laser safety circuit. | |||
* Always (with no exception) supervise the machine or have someone supervise it for you. Do not leave the laser cutter unattended while a job is running. | |||
* Immediately e-stop the machine in case of a fire and after that start extinguishing it. | |||
* Stop the laser job and investigate if you smell or hear anything weird. | |||
* Make sure nobody stays in the pit (performing work, or sleeping there - just fetching a box is fine) and hang the white/red chain before starting the laser. | |||
* Never attempt to laser-cut unknown or dangerous materials. If in doubt, do not laser-cut. | |||
* Do not stick your hands or other parts of your body in the machine while (you or someone else is) operating the controller. | |||
* Remove any additional workpieces from the laser bed; they pose a fire hazard. | |||
== Safety precautions == | |||
* Check the laser cutter for recognizable defects/damages/irregularities before using it. | |||
* Always leave the "Laser"-Switch in the off-position when the laser is not needed. | |||
* Make yourself aware of where the fire extinguishers are located. | |||
* Know where the E-Stop and Power-Off switches are located at. | |||
==== Important switches explained ==== | |||
* '''Laser-Switch:''' Controls the "enable" pin on the laser power supply. While off, the laser power supply will not turn on. | |||
* '''E-Stop''': Shuts off the power supply for stepper motors and the laser power supply (moving parts + laser beam) | |||
* '''Main power switch''': Used to turn the machine on/off, disables power to the entire machine (moving parts + laser beam + control/safety circuits) | |||
* '''Air Vent''': Press to start air exhaust/ventilation. Will keep on for 10 seconds or as long as the laser is running. Watch for status light to confirm air flow is nominal. Started separately from the main laser supply as it's loud and annoying. | |||
== Laser-cutable materials == | |||
https:// | We recommend that new users cut/engrave poplar (wood) or MDF. A good list of [https://dallasmakerspace.org/wiki/Laser_Cutter_Materials dangerous and safe materials can be found here]. | ||
If you are unsure what material it is or if you can not find information if it is safe to laser, always default to 'unsafe' and do not laser-cut. | |||
== Preparing your files == | |||
# Connect your computer to the "munichmakerlab" wifi. The password is written on the postbox mounted on the workshop door. | |||
# Using the (windows pre-installed) "remote desktop" or (mac, additional software) "[https://apps.apple.com/us/app/microsoft-remote-desktop/id1295203466?mt=12 Microsoft Remote Desktop]", connect to "laserpc" (or IP 10.10.20.81). The username and password are 'makerman'. | |||
# Once connected, navigate to the Z:\laser\ folder and create a folder with your (lab-unique) name or nickname | |||
# Now you can copy and paste vector files (.ai, .dxf, .svg) from your local computer into the folder on the computer | |||
# Open LightBurn on the laserpc (icon on the desktop) and import (ctrl + i) your file | |||
== Technical Details, Manuals & Files == | |||
https://wiki.munichmakerlab.de/wiki/ | These resources are '''not''' needed by users. | ||
* [[LaserCutter/Technical Details]] | |||
* [[LaserCutter/Calibration]] | |||
* [https://wiki.munichmakerlab.de/wiki/File:Laser%20Cutter%20Door%20Bracket-STL%20and%20Fusion360%20file.zip 3D model of Laser Cutter door bracket (STL and Fusion360 file)] | |||
== Tips and Tricks == | |||
This [https://docs.google.com/presentation/d/1Ra56usqYbG-8oADPOyG4eDwnKWwOrgkof9u4UqbFWIk/edit?usp=sharing PowerPoint] is '''not''' needed by users but is useful, for beginners and first time users, please refer to this [https://docs.google.com/presentation/d/1mnYwoEByULWz7uwHjkz9AstAIT-9Vb-CBWk5OmvVvgw/edit?usp=drivesdk PowerPoint], the wiki and the diagram posted by the laser cutter if in doubt of the workflow when operating the cutter. | |||
Refer to the workflow below for how to physically interact with the laser cutter, then look at the [https://docs.google.com/presentation/d/1Ra56usqYbG-8oADPOyG4eDwnKWwOrgkof9u4UqbFWIk/edit?usp=sharing PowerPoint]when you reach the step '''Remote desktop into the laser cutter PC''' | |||
[[File:DIAGRAM LASER CUTTER.png|400px]] | |||
=== Speed and power suggestions === | |||
The following tables have a couple of suggestions for speed and power values to use for common materials. Please feel free to extend them if you find new values that work well for your material. | |||
== | ==== Cut ==== | ||
To cut, you generally want higher power and lower speeds. If you're cutting acrylic, make sure to leave the protective film on for cutting. This protects your material from marks left by the fumes occurring during the cutting process. | |||
{| class="wikitable sortable" | |||
! Material !! Thickness (mm) !! Speed (mm/s) !! Power (%) | |||
|- | |||
| Acrylic || 6 || 8 || 70 | |||
|- | |||
| Acrylic || 3 || 20 || 60 | |||
|- | |||
| Plywood || 3 || 30 || 50 | |||
|- | |||
| Plywood || 5 || 17 || 75 | |||
|} | |||
==== Engrave ==== | |||
Since you generally want to be relatively shallow when engraving, you're looking for high speed and low power. | |||
{| class="wikitable sortable" | |||
! Material !! Brightness of engraving !! Speed (mm/s) !! Power (%) | |||
|- | |||
| Acrylic || || 200 || 10 | |||
|- | |||
| Plywood || lighter || 300 || 11 | |||
|} | |||
=== Lightburn Tips === | |||
* If you want to delete a part of a line of an object select the "Node Edit Tool" on the left menubar, hover over a line and press the "D" key. | |||
* | |||
== | == Troubleshooting == | ||
* If all lights are green and the cutter head isn't moving (the display will most likely show "System resetting"), check the emergency stop is not pressed in. | |||
* If you are having trouble Remote Desktop connecting to the Laser PC, make sure you are connected to the MuMaLab WIFI. | |||
* If you are connected to the laser cutter via remote desktop and cannot send a file, save your Lightburn file and close light burn, open Lightburn again and try to re send the file | |||
* If display of the unlock-system shows "MQTT-Error": Wait some minutes. Mostly the error will vanish after some time. Otherwise restart the laser with the main power button. | |||
* | |||
== Finance == | == Finance == | ||
A 100W laser tube costs around 1200€ and has a lifetime of 6000-10000h. On the [[20150315 Plenum]]/[[20161009 Plenum#Commercial_use_of_the_laser_cutter|20161009 Plenum]]), it was decided that the following usage fee will be charged: | |||
* 2€ per 10min for members | |||
* 4€ per 10min for non-members | |||
* 2€ per 10min for members | * 5€ per 10min for "commercial" use | ||
[[Category:Project]] [[Category:Inventory]] | [[Category:Project]] [[Category:Inventory]] | ||
Latest revision as of 07:35, 6 April 2025
| Attention: Dangerous machine ahead | ||
|---|---|---|
| Use only at your own risk. Taking a laser introduction course is mandatory to use this machine. |
| LaserCutter Status: working [box doku] | |
|---|---|

| |
| Description | A Laser to cut stuff |
| Owner | MuMaLab |
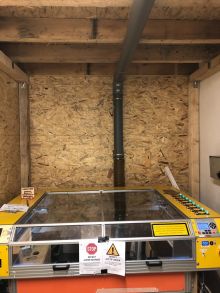
Laser cutters are an excellent tool for cutting and engraving wood and acrylic glass. To get started, you will need a vector file (bought online or created by yourself in Inkscape/illustrator) and laser-safe material. This page will give you an overview of the laser cutter, safety information, and instruction on how to use it. Before using it, you must complete a machine introduction course.
Current Status
- Undergoing major maintenance and upgrades
- Lens: 50mm
Features
- Big build area (Table Size: 1240 x 1000 mm / max Cutting Size: 1140 x 800 mm)
- Pilot laser for dry run and positioning
- 90W CO2, wavelength ≈ 10 microns
Components / Parts
- Trocen AWC7824 Controller Laser Engraving Cutting Controller
- Reci 90W CO2 Laser Tube
- DY13 100W Laser PSU
- OpenLaserSafety v1.0
- Exhaust System including filters
- Air pump (for Nozzle)
Safety

Laser cutters are dangerous in various aspects. There is an invisible laser beam that can permanently damage your eye. The fumes that escape while laser-cutting or engraving materials are at least unhealthy, in some cases toxic and worst case can cause severe health issues when inhaled. There is also a chance of starting a fire if operated incorrectly.
- Undergoing a training course is mandatory before you start using the laser.
- Do not tamper or work around any safety measures, including the machine activation and laser safety circuit.
- Always (with no exception) supervise the machine or have someone supervise it for you. Do not leave the laser cutter unattended while a job is running.
- Immediately e-stop the machine in case of a fire and after that start extinguishing it.
- Stop the laser job and investigate if you smell or hear anything weird.
- Make sure nobody stays in the pit (performing work, or sleeping there - just fetching a box is fine) and hang the white/red chain before starting the laser.
- Never attempt to laser-cut unknown or dangerous materials. If in doubt, do not laser-cut.
- Do not stick your hands or other parts of your body in the machine while (you or someone else is) operating the controller.
- Remove any additional workpieces from the laser bed; they pose a fire hazard.
Safety precautions
- Check the laser cutter for recognizable defects/damages/irregularities before using it.
- Always leave the "Laser"-Switch in the off-position when the laser is not needed.
- Make yourself aware of where the fire extinguishers are located.
- Know where the E-Stop and Power-Off switches are located at.
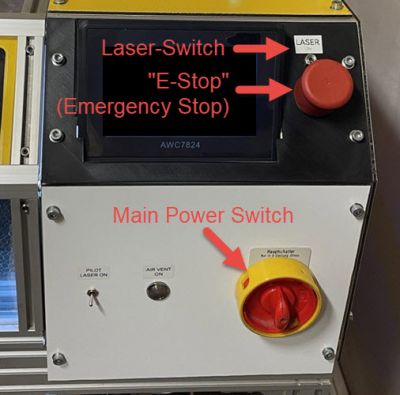
Important switches explained
- Laser-Switch: Controls the "enable" pin on the laser power supply. While off, the laser power supply will not turn on.
- E-Stop: Shuts off the power supply for stepper motors and the laser power supply (moving parts + laser beam)
- Main power switch: Used to turn the machine on/off, disables power to the entire machine (moving parts + laser beam + control/safety circuits)
- Air Vent: Press to start air exhaust/ventilation. Will keep on for 10 seconds or as long as the laser is running. Watch for status light to confirm air flow is nominal. Started separately from the main laser supply as it's loud and annoying.
Laser-cutable materials
We recommend that new users cut/engrave poplar (wood) or MDF. A good list of dangerous and safe materials can be found here. If you are unsure what material it is or if you can not find information if it is safe to laser, always default to 'unsafe' and do not laser-cut.
Preparing your files
- Connect your computer to the "munichmakerlab" wifi. The password is written on the postbox mounted on the workshop door.
- Using the (windows pre-installed) "remote desktop" or (mac, additional software) "Microsoft Remote Desktop", connect to "laserpc" (or IP 10.10.20.81). The username and password are 'makerman'.
- Once connected, navigate to the Z:\laser\ folder and create a folder with your (lab-unique) name or nickname
- Now you can copy and paste vector files (.ai, .dxf, .svg) from your local computer into the folder on the computer
- Open LightBurn on the laserpc (icon on the desktop) and import (ctrl + i) your file
Technical Details, Manuals & Files
These resources are not needed by users.
- LaserCutter/Technical Details
- LaserCutter/Calibration
- 3D model of Laser Cutter door bracket (STL and Fusion360 file)
Tips and Tricks
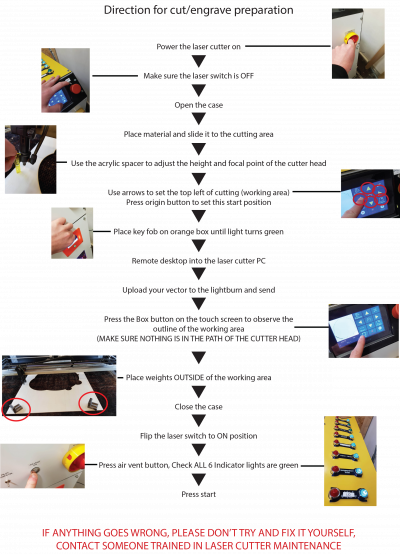
This PowerPoint is not needed by users but is useful, for beginners and first time users, please refer to this PowerPoint, the wiki and the diagram posted by the laser cutter if in doubt of the workflow when operating the cutter.
Refer to the workflow below for how to physically interact with the laser cutter, then look at the PowerPointwhen you reach the step Remote desktop into the laser cutter PC
Speed and power suggestions
The following tables have a couple of suggestions for speed and power values to use for common materials. Please feel free to extend them if you find new values that work well for your material.
Cut
To cut, you generally want higher power and lower speeds. If you're cutting acrylic, make sure to leave the protective film on for cutting. This protects your material from marks left by the fumes occurring during the cutting process.
| Material | Thickness (mm) | Speed (mm/s) | Power (%) |
|---|---|---|---|
| Acrylic | 6 | 8 | 70 |
| Acrylic | 3 | 20 | 60 |
| Plywood | 3 | 30 | 50 |
| Plywood | 5 | 17 | 75 |
Engrave
Since you generally want to be relatively shallow when engraving, you're looking for high speed and low power.
| Material | Brightness of engraving | Speed (mm/s) | Power (%) |
|---|---|---|---|
| Acrylic | 200 | 10 | |
| Plywood | lighter | 300 | 11 |
Lightburn Tips
- If you want to delete a part of a line of an object select the "Node Edit Tool" on the left menubar, hover over a line and press the "D" key.
Troubleshooting
- If all lights are green and the cutter head isn't moving (the display will most likely show "System resetting"), check the emergency stop is not pressed in.
- If you are having trouble Remote Desktop connecting to the Laser PC, make sure you are connected to the MuMaLab WIFI.
- If you are connected to the laser cutter via remote desktop and cannot send a file, save your Lightburn file and close light burn, open Lightburn again and try to re send the file
- If display of the unlock-system shows "MQTT-Error": Wait some minutes. Mostly the error will vanish after some time. Otherwise restart the laser with the main power button.
Finance
A 100W laser tube costs around 1200€ and has a lifetime of 6000-10000h. On the 20150315 Plenum/20161009 Plenum), it was decided that the following usage fee will be charged:
- 2€ per 10min for members
- 4€ per 10min for non-members
- 5€ per 10min for "commercial" use

