Mqtt Dash Button: Difference between revisions
Jump to navigation
Jump to search
Created page with "{{project |name = Mqtt Dash Button |status = experimental |image = mqttdashbutton1.jpg |description = mqtt Dash Button low standby current |author = U..." |
No edit summary |
||
| Line 23: | Line 23: | ||
== Hardware == | == Hardware == | ||
U1: ESP8266-F | U1: ESP8266-F<br> | ||
R1: 200 OhmS | R1: 200 OhmS<br> | ||
R2: 10kOhm | R2: 10kOhm<br> | ||
T1: BC847 | T1: BC847<br> | ||
Q1: FDN340P | Q1: FDN340P<br> | ||
S1: Taster | S1: Taster<br> | ||
| Line 34: | Line 34: | ||
This is a low power MQTT DIY Dashbutton. | This is a low power MQTT DIY Dashbutton. | ||
After closing the Switch S1 the ESP | [[File:MqttdashbuttonEagleschem.png|thumb|Mqtt dash button]] | ||
To save energy the GPI0 4 is pulled to | After closing the Switch S1 the ESP starts. The first task is to set the GPIO 4 as output and put it to high. No the esp is powered by T1 and Q1. You can release the Switch. The esp is publishing the MQTT message. | ||
To save energy the GPI0 4 is pulled to ground and the transistor cut off the supply. | |||
Latest revision as of 06:56, 19 January 2019
| Mqtt Dash Button Release status: experimental [box doku] | |
|---|---|

| |
| Description | mqtt Dash Button low standby current |
| Author(s) | tobi |
| Platform | Arduino |
Hardware
U1: ESP8266-F
R1: 200 OhmS
R2: 10kOhm
T1: BC847
Q1: FDN340P
S1: Taster
How it works
This is a low power MQTT DIY Dashbutton.

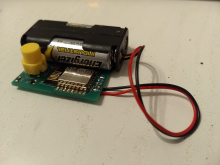
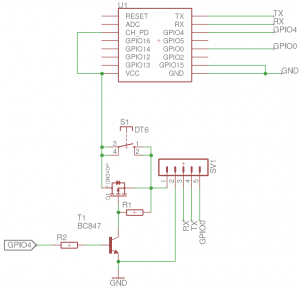
After closing the Switch S1 the ESP starts. The first task is to set the GPIO 4 as output and put it to high. No the esp is powered by T1 and Q1. You can release the Switch. The esp is publishing the MQTT message. To save energy the GPI0 4 is pulled to ground and the transistor cut off the supply.


