
Orca Slicer
From The Munich Maker Lab's Wiki
Installation
- Download the latest version here
- Step through the install wizard, choosing defaults except for the following customizations:
- When choosing printers, select:
- Bambu P1S
- Prusa mini
- Prusa MK3S
- If you are privacy-conscious, enable 'Stealth Mode' to stay offline.
- Install the Bambu Network plug-in to directly control our Bambu P1S printers.
- When choosing printers, select:
Congratulations! You're now set up to use the printers!
Usage
The following screenshots show you how to use the software. If you would like to use the same model, you can download it here.
The Interface
There are two main views in Orca Slicer that you should use: Prepare and Preview. If you are using a Bambu P1S, you may also use the Device view to control the printer.
Prepare View

- Choose your printer and nozzle settings. ⚠️This should match the printer in the lab, the software will not correct you if you get this wrong!
- Filament choice. Usually you can just use 'Generic PLA' or 'Generic PETg', depending on if you are using PLA or PETg filament.
- Printing Process: change the process to get different presets (e.g. Draft, Strength, Extra Draft)
- Process Settings: configure printing options. Usually you don't need to touch this unless you are having trouble with your prints. Show more options by enabling 'Advanced Settings' by clicking the little Atom icon in [3].
- Model Toolbar:
- Add a model to the slicer by clicking the 'Add' button (
 ).
). - Automatically position multiple objects with the 'Auto Orient' button (
 )
) - Selecting an object will enable scaling/placement tools to arrange the object on the printer bed.
- Add a model to the slicer by clicking the 'Add' button (
- Camera controls: position the camera to look at your virtual printer stage from different angles.
- Slice: click this button to slice your model.


Preview View

- Stage showing the filament path that will build your model.
- This popover shows details about your print, most importantly estimated print time. Click the 'summary' dropdown to view other details, such as layer time.
- This slider chooses which layer is displayed on the stage.
- This slider sweeps the print head's progress through the currently selected layer.
- Send the model to a connected network printer. If you've selected a printer that needs files transferred over physical media (USB stick or SD card) this will display 'Export G-code file'
Device View (only for Bambu Lab printers)

- Choose the device you are connected to. See #Connecting a device.
- Set filament settings for Automatic Material System (AMS) if appropriate.
- Set filament settings for external feeder
- Monitor print progress
Basic Usage
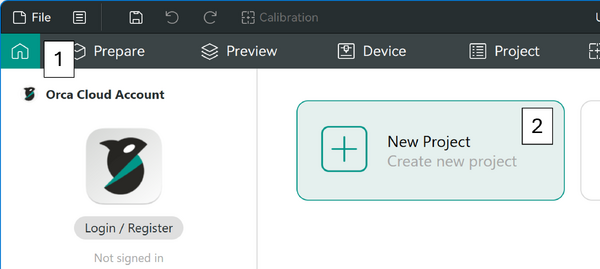
- Click the 'Home' button in the top left (1), and then click 'New Project' (2) to create a new slicer project.
- Start in the Prepare view, and use the Add button to load your STL file(s). Position them as appropriate.
- Select the right printer and nozzle size.
- Select the Filament type that you want to use.
- Choose a process (Standard is usually good)
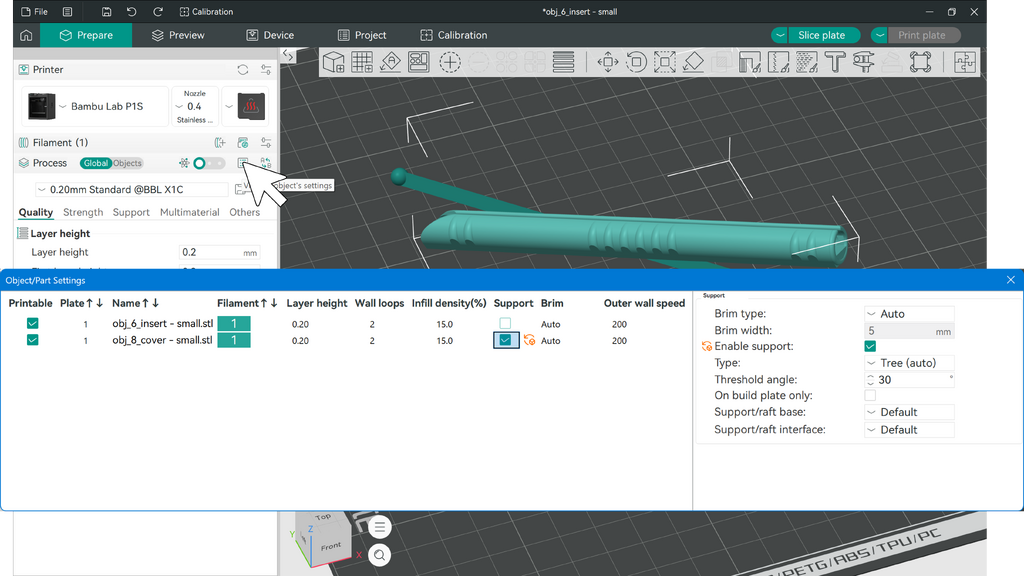
- If necessary, add supports.
- Click 'Slice Plate'.
- In the Preview view, review the expected print time and your expected model. Adjust process settings, and click 'Slice Plate' to see the effects of your changes.
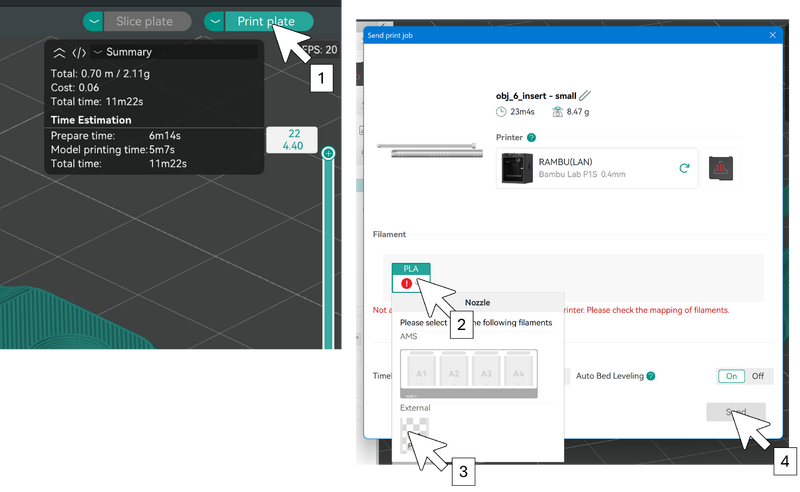
- When you are satisfied, click 'Print Plate' or 'Export G-code file' (depending on which printer you've selected).


Printing - Bambu
- If you are using one of the Bambu Lab printers, load filament from the Device view. Feed filament into the appropriate receptacle and follow the onscreen instructions to make sure it loaded correctly.
- Begin printing by clicking 'Send'
- Unload your filament when finished.

Printing - Prusa
- If you are using one of the Prusa printers, load the filament by selecting
- Copy the exported G-code file onto a USB stick or SD card, and insert the USB stick or SD card into the printer.
- Use the printer's controls to navigate to the G-code file and select it, then print.
- Unload your filament when finished.
Connecting/Disconnecting a device


