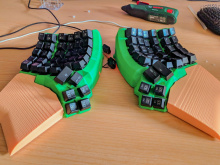
Dactyl-Manuform
| Dactyl-Manuform Release status: stable [box doku] | |
|---|---|

| |
| Description | A keyboard to better suit your ergonomic needs |
| Author(s) | simmarith (AdrianM) |
| Last Version | 1.0.0 |
| Platform | QMK |
| License | GPL v.3 |
| Download | https://github.com/abstracthat/dactyl-manuform |
I've built this Keyboard mostly by the book (or in this case, the readme.md of the github repo). These are the changes I've done:
- I've used two diymore pro micros so that the keyboards can work independently from each other
- I've used enamelled wire for the rows and the columns on both sides so that I don't need to worry about shorts (works pretty good btw) I didn't use any special tools to remove insulation, just a bunch of heat
- I've printed these palm rests as well
Parts
- 100x Cherry MX Green Switches
- 100x 1N 4148
- 2x Diymore Pro Micro
- Amazon Basics PETG in green
I've obviously not used all these, but I wanted to make super sure that I've got enough spares if I need them.
Steps
- Print the 2 shells (I've printed the 6x6 versions)(If you want I can print the shells for you, just ask AdrianM)
- Remove support
- Press in the switches to make sure they'll fit
Soldering
- Get the wiring diagram from the GitHub project, your soldering supplies, the diodes and the wire ready and get comfy - this is gonna take some time
- Remove the top left switch (top view), solder a diode to one pin
- Thread the wire through the hole for the switch (from the bottom) and form a tiny loop with the end
- put the loop over the other end of the diode and solder it on there (you'll need a bunch of heat to burn off the insulation - be patient)
- once the solder flowed over the wire and the diode leg let it cool (takes a few seconds) and then pull to make sure the connection is sturdy
- put the switch back into its position - congratulations! This is the first connection of many on your new keyboard.
- for the rest of the row just pull the key out, solder on the diode and put it back in. Wrap the wire around the other diode end and solder it in place
- At the end of the row make sure to have enough wire left over to solder to the microcontroller and cut the rest off
- For the rows: "catch" the first pin with a wire loop, wrap around the other pins as you did with the rows. You don't need diodes here, just solder directly to the pin of the switch
- solder the rows and columns to the microcontroller - ignore the things about skipping pins from the instruction
Configuring
- Go to https://config.qmk.fm/#/handwired/dactyl_manuform/6x6/LAYOUT_6x6
- Select your layout if you didn't also go for the 6x6
- Setup your layout for your left hand
- Save the keyboard.json
- Click on compile
- Wait
- Click on "firmware" to download the hex file
- Do the same for the right hand. Because we don't have a master/slave setup we need to configure the left side again, but with the keys for the right side. We also need to mirror the keys on the vertical axis.
- Compile and download again
Flashing
- You'll need to use avrdude from cli to flash the hex onto the diymore pro micro. See the instructions for that (here)[1]. To get the diymore pro micro into a flashable state you have to short reset and ground together while plugging it into USB.
Finishing
I've bought some threaded inserts and lasered the backplate that you can find in the repository x2. I just flipped one (after lasering) which works fine. I also designed some TPU standoffs which fit over the screws that hold the plate. They are specific to the screws and the screws themselves are undersized so I entrust you to design something yourself ;D I've bought a USB hub with individual switches to make flashing easier and only use one USB port.
