CNC3018 Pro: Difference between revisions
Spacezhang (talk | contribs) update |
Spacezhang (talk | contribs) Update |
||
| Line 43: | Line 43: | ||
= Getting started = | = Getting started = | ||
== Preparing your job == | |||
* Selecting your workpiece and determine its material. Please compair it to the material list to ensure it is a valid material for this machine! | |||
* Setup the Software needed for generation of Gcode (Instructions for the machine), Details see software guide! | |||
* Design your toolpath with consideration of avaliable bits and material specific speed and most importantly your workpiece size. | |||
* Export the toolpath as a .nc file | |||
* '''First time:''' get the software for controlling the Machine [https://github.com/Denvi/Candle Candle [External<nowiki>]</nowiki>] by either download from google drive ([[#Software| software section]]) or directly download it from source<br> | |||
** '''google drive download (Windows)''': | |||
*** Install the CH340SER driver using the executable in the driver | |||
*** GRBL Candle is locaded inside Grblcontrol(Candle_1.1.7) folder. | |||
* Open Candle and import your .nc file. Your'r now done with your CNC Job preparation! | |||
== Preparation == | |||
> this can also be done before setting up the machine. | |||
> Requires a laptop (currently only tested on windows platform) to generate and send the Gcode. | |||
* First get the Eurobox from the shelve and place it on a sturdy Table. | |||
* Open the lid by pulling back the two white locking lug on the box and pull the machine out by grabbing on the black aluminium extrusion bar. | |||
* Visually Inspect the machine, make sure that no cable are broken or loose, no parts wobble. | |||
* Take out the two accessorie boxes on the side of the box and take out the power supply and the USB - mini cable for connection to your Laptop. | |||
* Place your laptop near the Machine and connect the power and usb cable to the controller on the left side of the machine. | |||
* Plug the machine and optionally your laptop in. | |||
* Start the machine by pressing down the white button hidden on the lower left side of the controller board. | |||
==Basic operation== | ==Basic operation== | ||
* Change Router bits | This CNC machine is running the standard GRBL library and therefore accept standard GCode, USB Serial connection with Baud rate 115200. | ||
=== Mechanical Operation === | |||
Take out the two wrenches from the utility bag and use them to loosen the spindle and change the bits in the collet. | <div id="Software">Software</div> | ||
* Change Router bits / collet | |||
[[File:CNC3018Pro ChangeBit.jpg|thumb|CNC3018Pro Change Bit]] | |||
Take out the two wrenches from the utility bag and use them to loosen the spindle and change the bits in the collet / the collet. | |||
* Change Spindle | * Change Spindle | ||
Loosen the M5 Screw that holds the spindle motor in Place. Use a plying tool like the tip of a screwdriver to widen the gap and pull out the Spindle assembly. | Loosen the M5 Screw that holds the spindle motor in Place. Use a plying tool like the tip of a screwdriver to widen the gap and pull out the Spindle assembly. | ||
=== Candle Software === | |||
Candle is a open source GCode sender (only send commands!). It accept GCode files as input (.nc files) | |||
* Z Height map | * Z Height map | ||
Connect the height probe in the cable tray to the Mainboard from the Machine.<br> | Connect the height probe in the cable tray to the Mainboard from the Machine.<br> | ||
Place and secure the workpiece to the bed of the cnc. Make sure the surface is metallic! The aluminium tape avaliable in lab could be used to create such surface.<br> | Place and secure the workpiece to the bed of the cnc. Make sure the surface is metallic! The aluminium tape avaliable in lab could be used to create such surface.<br> | ||
| Line 71: | Line 98: | ||
[Detail and Tutorial comming soon] | [Detail and Tutorial comming soon] | ||
== Software Setup & Introduction == | == Software Setup & Introduction == | ||
====<div id="Software">Software</div>==== | |||
'''Set up the machine -> connect to laptop -> move to origin -> load sample gcode -> start milling '''<br> | '''Set up the machine -> connect to laptop -> move to origin -> load sample gcode -> start milling '''<br> | ||
Software for controlling the machine and for PCB Milling: <br> | Software for controlling the machine and for PCB Milling: <br> | ||
| Line 88: | Line 116: | ||
== Material settings == | == Material settings == | ||
= Machine Inventory = | = Machine Inventory = | ||
All Bits currently available. Collets are available in 1/2/3/3.5/4/5/6/7/8 mm. <br> | |||
[[File:Spoil board and clamps.jpg|thumb|alt=Spoil board and clamps|Spoil board and clamps]] | [[File:Spoil board and clamps.jpg|thumb|alt=Spoil board and clamps|Spoil board and clamps]] | ||
= Technichal Documentations = | = Technichal Documentations = | ||
| Line 186: | Line 215: | ||
$132=200.000 | $132=200.000 | ||
</pre> | </pre> | ||
=== Resources === | |||
*[https://s3.amazonaws.com/s3.image.smart/download/101-60-280PRO/Genmitsu_3018PRO_CNC_Router_Manual_German_v1_0.pdf Genmitsu_3018PRO_CNC_Router_Manual_German_v1_0.pdf] | |||
*[http://s3.amazonaws.com/s3.image.smart/download/101-60-280/Schematic_WOODPECKER.pdf Schematic for WOODPECKER] | |||
== Feedback and suggestions == | == Feedback and suggestions == | ||
If you have any feedback, request or suggestions in regard to this project and wiki page, please feel free to contach me or simply edit this section of wiki.<br> | If you have any feedback, request or suggestions in regard to this project and wiki page, please feel free to contach me or simply edit this section of wiki.<br> | ||
Revision as of 12:41, 27 September 2022
Warning: This page is still a work in Progress, please contact Yichen Zhang (Spacezhang) on Slack if more Information is needed
 Warning: Beware of the dangers of CNC machines! Use at your own risk and only if you know what exactly you are doing!
Please contact Yichen for detailed explaination and tutorial
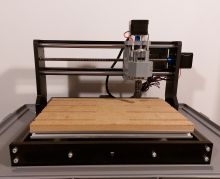
| CNC 3018 Pro Release status: experimental [box doku] | |
|---|---|
| |
| Description | Milling/ Engraving Machine |
| Author(s) | Yichen Zhang (Spacezhang) |
| Last Version | v0.1 pre alpha test (01.09.2022) |
General Introduction
A small but full-featured cnc running GRBL donated to the lab for use, brought to you and maintained by Yichen.
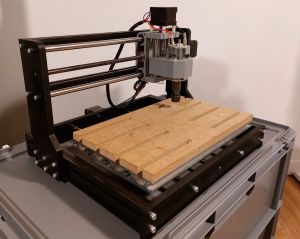
What is the CNC 3018 Pro?
The CNC 3018 Pro is a generic engraving machine. This machine can be used to cut anything from wax to wood and is very good for getting started and learn how to use a CNC machine and how It works.
Acceptable work piece materials
Engrave/ Cut
- MDF / HDF
- Softwood, Hardwood, Plywood
- Acrylic
- PCB
- Very soft Aluminium (no harder than brass or aluminum 6061) (Detail untested)
+ Height Map support
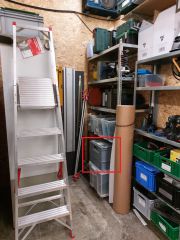
Current Machine Location
 |
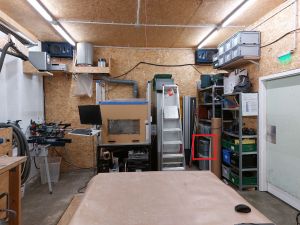 |
The CNC engraving machine is is currently stored in a EuroBox on the right side shelf in the machine workshop.
Getting started
Preparing your job
- Selecting your workpiece and determine its material. Please compair it to the material list to ensure it is a valid material for this machine!
- Setup the Software needed for generation of Gcode (Instructions for the machine), Details see software guide!
- Design your toolpath with consideration of avaliable bits and material specific speed and most importantly your workpiece size.
- Export the toolpath as a .nc file
- First time: get the software for controlling the Machine Candle [External] by either download from google drive ( software section) or directly download it from source
- google drive download (Windows):
- Install the CH340SER driver using the executable in the driver
- GRBL Candle is locaded inside Grblcontrol(Candle_1.1.7) folder.
- google drive download (Windows):
- Open Candle and import your .nc file. Your'r now done with your CNC Job preparation!
Preparation
> this can also be done before setting up the machine. > Requires a laptop (currently only tested on windows platform) to generate and send the Gcode.
- First get the Eurobox from the shelve and place it on a sturdy Table.
- Open the lid by pulling back the two white locking lug on the box and pull the machine out by grabbing on the black aluminium extrusion bar.
- Visually Inspect the machine, make sure that no cable are broken or loose, no parts wobble.
- Take out the two accessorie boxes on the side of the box and take out the power supply and the USB - mini cable for connection to your Laptop.
- Place your laptop near the Machine and connect the power and usb cable to the controller on the left side of the machine.
- Plug the machine and optionally your laptop in.
- Start the machine by pressing down the white button hidden on the lower left side of the controller board.
Basic operation
This CNC machine is running the standard GRBL library and therefore accept standard GCode, USB Serial connection with Baud rate 115200.
Mechanical Operation
- Change Router bits / collet
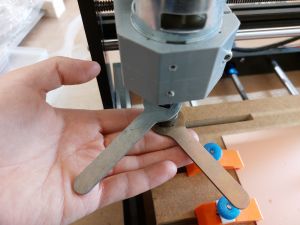
Take out the two wrenches from the utility bag and use them to loosen the spindle and change the bits in the collet / the collet.
- Change Spindle
Loosen the M5 Screw that holds the spindle motor in Place. Use a plying tool like the tip of a screwdriver to widen the gap and pull out the Spindle assembly.
Candle Software
Candle is a open source GCode sender (only send commands!). It accept GCode files as input (.nc files)
- Z Height map
Connect the height probe in the cable tray to the Mainboard from the Machine.
Place and secure the workpiece to the bed of the cnc. Make sure the surface is metallic! The aluminium tape avaliable in lab could be used to create such surface.
Check that the router bit is secured in the spindle and move the head of the bits to a starting position relativ to the workpiece. Zero the machine via Zero XY and Zero Z on the upper right side of the software.
Enter the height map creation menu and set the desired size of probing area. Preloading the toolpath would be helpful as it would be visuallized.
Set the probing height, feed and speeds according to your need and the deviation of the surface height.
Connect one side of the probe to the metallic surface, and the other one to the router bit. You can test the connection with the spindle lifted and manually shorting the two connection while probing.
Click Probe and start probing. This could take a while but it will be worth it.
When Probing is finished, you can either save the heightmap or use the heightmag directly on the next engraving. Exit the height map creator and don't forget to click use heightmap.
Please Inspect the machine in regards of integrity before Use!
Please check:
- Is all cable connected correctly and in tact?
- Is the linear rods and drive screw damage free?
[Detail and Tutorial comming soon]
Software Setup & Introduction
Software
Set up the machine -> connect to laptop -> move to origin -> load sample gcode -> start milling
Software for controlling the machine and for PCB Milling:
https://drive.google.com/drive/folders/1bQ-ewmTWgRL_v9L2HsZoTOGtxflSw3Ma?usp=sharing
Software for 2D Routing:
https://carbide3d.com/carbidecreate/
or opencam
https://cam.openbuilds.com/
Tutorial comming soon, till then please search on youtube or ask for instructions on slack
Wood Engraving / Milling
PCB Engraving
Acrylic Engraving / Milling
Test Gcode
[Detail comming soon]
Maintanence
[Detail comming soon]
Material settings
Machine Inventory
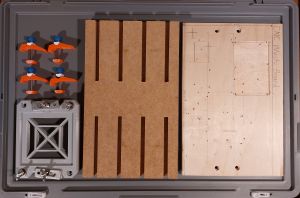
All Bits currently available. Collets are available in 1/2/3/3.5/4/5/6/7/8 mm.
Technichal Documentations
Specifications
Mechanical Specifications
- Type: Milling / Engraving machine
- Machine dimensions: 330 x 400 x 240 mm (13.0″ x 15.7″ x 9.4″)
- Working area: 300 x 180 x 45 mm (11.8″ x 7.1″ x 1.8″)
- Frame: Extruded Aluminum
- Linear system: Lead screw driven with rods and linear bearings
- Materials: Woods, Plastics, PVCs, soft aluminum (6061), Nylon, Acrylic, PCBs
- Motion: NEMA 17 Stepper motors
Spindle
- Motor: 775 motor, 24 V , ~8,000 RPM
- Rated current: 1.2A @ 24V.
- Cooling Fan: Internal
- Overall Size: 98x42mm, Full Round Type Ø5mm shaft.
- Collets: ER 11
Routing Bits
- Currently only 3.175 mm (1/8 Inch) Bits Available
- V Bits 20 / 40 / 60 degree
- Multifunctional cutting bits 0.8 – 3.175 mm
- Single flute upward cutting bits 3.175mm, 2mm
- 3.175mm Ball end double flute bits
Controll Board
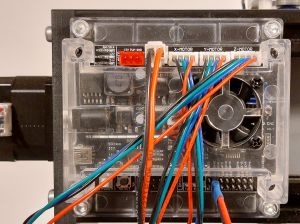
- Woodpecker V3.4 Mainboard
- Running GRBL 1.1f
- Interface Compatibility: Windows, Mac OS, Linux
[Detail comming soon]
Ongoing upgrades
- Vaccume chip suction adapter
- Emergency Stop around front panel
- New Waste Board
- Different diamenter ER11 Collets holder
Possible Improvements
- Install End Stops
- Drag Knife cutter for vinyl Logo Cutting
- Better Z – Probe
- Laser Module for laser cutting / Engraving
- Chip suction device
- Second better waste Board
- Spindle Upgrade for better cutting
[Detail comming soon]
Sample cuts and demonstration projects
Replacement part list
Current GRBL Settings
GRBL 1.1f
$0=10
$1=25
$2=0
$3=2
$4=0
$5=0
$6=0
$10=1
$11=0.010
$12=0.002
$13=0
$20=0
$21=1
$22=0
$23=0
$24=50.000
$25=500.000
$26=250
$27=1.000
$30=1000
$31=0
$32=0
$100=800.000
$101=800.000
$102=800.000
$110=1000.000
$111=1000.000
$112=800.000
$120=30.000
$121=30.000
$122=30.000
$130=200.000
$131=200.000
$132=200.000
Resources
Feedback and suggestions
If you have any feedback, request or suggestions in regard to this project and wiki page, please feel free to contach me or simply edit this section of wiki.
Feedback/Request/suggestions:


