Archive:SNES DJ Controller: Difference between revisions
mNo edit summary |
m Aaron moved page SNES DJ Controller to Archive:SNES DJ Controller |
||
| (6 intermediate revisions by 2 users not shown) | |||
| Line 1: | Line 1: | ||
{{outdated|type=member project|moretext=Project from 2017}} | |||
{{project | {{project | ||
|name = SNES DJ Controller | |name = SNES DJ Controller | ||
|status = | |status = beta | ||
|image = | |image = snes_controller.png | ||
|description = A small MIDI-Controller for DJs inside a casing of a SNES | |description = A small MIDI-Controller for DJs inside a casing of a SNES | ||
|author = [[User:Jan|Jan]] | |author = [[User:Jan|Jan]] | ||
| Line 28: | Line 29: | ||
== Milestones == | == Milestones == | ||
=== | === ☑ sending MIDI === | ||
My first goal was sending MIDI data to the PC. | My first goal was sending MIDI data to the PC. | ||
MIDI is a pretty basic serial protocol transmitting data with 31250 baud. | MIDI is a pretty basic serial protocol transmitting data with 31250 baud. | ||
| Line 34: | Line 35: | ||
This will be changed in the future. | This will be changed in the future. | ||
=== | === ☑ preparing the case === | ||
All of the inner parts of the Super Nintendo have been removed. | All of the inner parts of the Super Nintendo have been removed. | ||
This includes the controller ports, the main PCB, the top dark-grey panel and also some plastic struts. | This includes the controller ports, the main PCB, the top dark-grey panel and also some plastic struts. | ||
The (still working) parts will be put into a new fancy case to give this classic console a new life. | The Controller-Port in the front was replaced by a 3d printed part. You can get the .stl and openscad file here: [[media:snes_front.zip|snes_front.zip]] | ||
The (still working) console parts will be put into a new fancy case to give this classic console a new life. | |||
=== | [[File:snes_faceplate_v2.jpg|200px|thumb|right|Faceplate v2]] | ||
=== ☑ cutting the faceplate === | |||
The faceplate was laser-cut. Until now i have built three iterations of this part. | The faceplate was laser-cut. Until now i have built three iterations of this part. | ||
# Wood - Buttons were too close together and had only 24mm holes. | # Wood - Buttons were too close together and had only 24mm holes. | ||
# Wood - Buttons and pots fit great | # Wood - Buttons and pots fit great | ||
# Plexiglas (latest) - same as above but shiny, see-through acrylic glas<br>i knew it was a great idea to order that casemodding window kit back in 2003. | # Plexiglas (latest) - same as above but shiny, see-through acrylic glas<br>i knew it was a great idea to order that casemodding window kit back in 2003. | ||
You can get the latest files here: [[media:snes_faceplate.zip|snes_faceplate.zip]] (contains SVG and DXF) | |||
=== ☑ installing and wiring buttons and pots === | |||
=== ☑ make nice holders for the components === | |||
=== ☑ add blinkenlights === | |||
Every project needs [https://en.wikipedia.org/wiki/Blinkenlights blinkenlights].<br> | |||
Although the arduino has 54 digital outputs it cannot provide enough energy for 16 RGB LEDs (48 channels). Therefore i used the awesome TLC5940 LED driver ICs for driving the LEDs. For this i soldered a own breadboard | |||
Demo-video here: [https://www.youtube.com/watch?v=OpaUb_CSQ_E] | |||
=== ☐ design proper power distribution === | |||
=== ☐ solve lights+potentiometer issues === | |||
=== ☐ send real MIDI === | |||
=== ☐ make nice connectors section === | |||
=== ☐ add more awesome features === | |||
[[Category:Project]] | [[Category:Project]] | ||
Latest revision as of 13:04, 10 September 2022
 You are visiting an old member project. The information found on "SNES DJ Controller" might be out of date. Project from 2017
| SNES DJ Controller Release status: beta [box doku] | |
|---|---|

| |
| Description | A small MIDI-Controller for DJs inside a casing of a SNES |
| Author(s) | Jan |
Overview
Parts used
- 50 RGB LEDs, common anode
- USB<->MIDI Cable
- 8 Arcade Switches white/clear
- 8 potentiometers 10k, mono, linear, no raster
- TLC5940 LED driver
- SNES
- Arduino Mega
- Plexiglas
Most of the stuff was already there. I just had to order the bold marked things.
Milestones
☑ sending MIDI
My first goal was sending MIDI data to the PC. MIDI is a pretty basic serial protocol transmitting data with 31250 baud. For testing purposes i send data at 9600 baud via the arduinos serial interface to a software called Hairless MIDI. This will be changed in the future.
☑ preparing the case
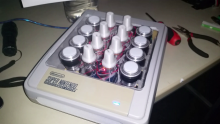
All of the inner parts of the Super Nintendo have been removed. This includes the controller ports, the main PCB, the top dark-grey panel and also some plastic struts. The Controller-Port in the front was replaced by a 3d printed part. You can get the .stl and openscad file here: snes_front.zip The (still working) console parts will be put into a new fancy case to give this classic console a new life.

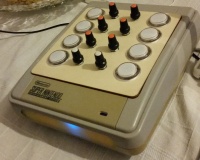
☑ cutting the faceplate
The faceplate was laser-cut. Until now i have built three iterations of this part.
- Wood - Buttons were too close together and had only 24mm holes.
- Wood - Buttons and pots fit great
- Plexiglas (latest) - same as above but shiny, see-through acrylic glas
i knew it was a great idea to order that casemodding window kit back in 2003.
You can get the latest files here: snes_faceplate.zip (contains SVG and DXF)
☑ installing and wiring buttons and pots
☑ make nice holders for the components
☑ add blinkenlights
Every project needs blinkenlights.
Although the arduino has 54 digital outputs it cannot provide enough energy for 16 RGB LEDs (48 channels). Therefore i used the awesome TLC5940 LED driver ICs for driving the LEDs. For this i soldered a own breadboard
Demo-video here: [1]
