Archive:Tool inlay foam: Difference between revisions
Jump to navigation
Jump to search
 You are visiting an old member project. The information found on "Tool inlay foam" might be out of date.
No edit summary |
m (Vrs moved page Tool inlay foam to Archive:Tool inlay foam without leaving a redirect) |
||
| (2 intermediate revisions by 2 users not shown) | |||
| Line 1: | Line 1: | ||
{{outdated|type=member project}} | |||
{{project | {{project | ||
|name = Tool inlay foam | |name = Tool inlay foam | ||
|status = | |status = obsolete | ||
|image = | |image = | ||
|description = Inlays for the drawers | |description = Inlays for the drawers | ||
| Line 15: | Line 17: | ||
==Actual situation== | ==Actual situation== | ||
All | All tools are sitting in one drawer and you will never find the right tool. | ||
Latest revision as of 17:22, 10 September 2022
 You are visiting an old member project. The information found on "Tool inlay foam" might be out of date.
| Tool inlay foam Release status: obsolete [box doku] | |
|---|---|
| Description | Inlays for the drawers |
| Author(s) | Demotape (talk) Theo (talk) |
Actual situation
All tools are sitting in one drawer and you will never find the right tool.

We need a solution like this: https://www.google.de/search?q=shadow+board&tbm=isch
The Plan
The plan is to make foam inlays for the drawers with our foam cutter.
Step 1 - Take a photo
Sort the tools and take a photo on the "light tabel":-)

Theo at the light table
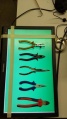
The light table


Step 2 - Create a path
Create a path around the tools
tbd
Step 3 - Path to DXF
We used Incscape to save the path as a DXF.
Step 4 - Create G-Code
We used the tool dxf2gcode
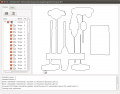
DXF2GCODE

Step 5 - Cut the foam
tbd
