Bambulab P1S: Difference between revisions
Jump to navigation
Jump to search
Spacezhang (talk | contribs) Created page with "{{ThingInfoBox |name = Bambulab P1S + AMS |status = working |image = P1S.png |description = Bambulab P1S + AMS |owner = MuMaLab |username = |financing = Bought from official Vendor (€877) |buildvolume = 256x 256x 256 mm (11.8 x 11.8 x 15.7 in) |nozzle = 0.4 mm stainless steel }} TBD == Details == TBD == Quickstart guide== TBD == Machine operation == === Insert filament === [comming soon] === Unload filament === [comming soon] === Start..." |
Connecting to the Printer section added |
||
| Line 19: | Line 19: | ||
TBD | TBD | ||
== Machine operation == | == Machine operation == | ||
=== Connecting to the Printer === | |||
* Go to the printer page in Bambu Studio | |||
[[File:Bambu device.png|thumb|center]] | |||
* Click on "No Printer" to open the dropdown | |||
[[File:Bambu no printer.png|thumb|center]] | |||
* Select the only printer that shows up | |||
[[File:Bambu select printer.png|thumb|center]] | |||
* Enter the access code you can get from the printers settings | |||
[[File:Bambu access code.png|thumb|center]] | |||
And that's it! You should be able to run calibration for your filament, send a print and watch it with the webcam now. Beware that this *should* only work from the munichmakerlab WiFi. | |||
=== Calibrating your own filament === | |||
If you bring non-bambu filament you'll probably have to calibrate it first. For this you'll need the official BambuStudio slicer as calibration does not appear to work with orcaslicer. | |||
=== Insert filament === | === Insert filament === | ||
[comming soon] | [comming soon] | ||
Revision as of 17:24, 13 July 2024
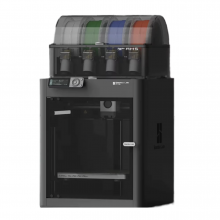
| Bambulab P1S + AMS Status: working [box doku] | |
|---|---|
| |
| Description | Bambulab P1S + AMS |
| Owner | MuMaLab |
| Financing | Bought from official Vendor (€877) |
| Build Volume | 256x 256x 256 mm (11.8 x 11.8 x 15.7 in) |
| Nozzle | 0.4 mm stainless steel |
TBD
Details
TBD
Quickstart guide
TBD
Machine operation
Connecting to the Printer
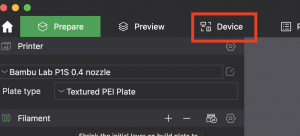
- Go to the printer page in Bambu Studio
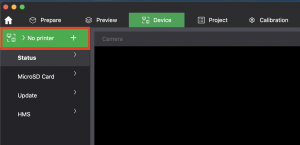
- Click on "No Printer" to open the dropdown
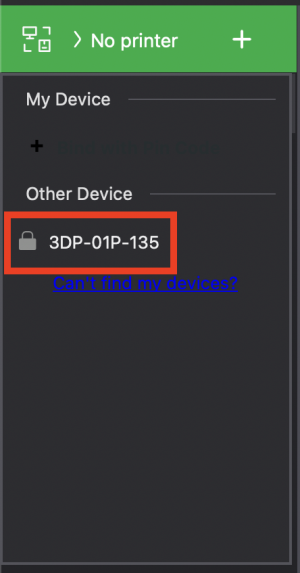
- Select the only printer that shows up
- Enter the access code you can get from the printers settings
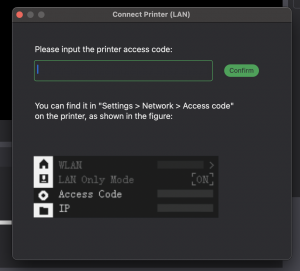
And that's it! You should be able to run calibration for your filament, send a print and watch it with the webcam now. Beware that this *should* only work from the munichmakerlab WiFi.
Calibrating your own filament
If you bring non-bambu filament you'll probably have to calibrate it first. For this you'll need the official BambuStudio slicer as calibration does not appear to work with orcaslicer.
Insert filament
[comming soon]
Unload filament
[comming soon]
Start a print job
[comming soon]
Unified bed leveling
[comming soon]
Guide Video
[comming soon]
Finished calibration
TBD
Suggestions and Feedback
Do you have any suggestions or feedback in regard to the printer, its maintainance and its current status?
Please write your comments below!
- [Comment]
