LaserCutter/Calibration: Difference between revisions
No edit summary |
|||
| Line 37: | Line 37: | ||
See figure 2 for how this measurement should look and how the nut and emitter head are assembled. | See figure 2 for how this measurement should look and how the nut and emitter head are assembled. | ||
[[File:NutDistanceLaserEmitterAssrmbly.png|thumb|Figure 2 - Based on descriptions from this section, this is how the 63.2mm was measured to ensure the optimal nut rotation for cutting]] | |||
Latest revision as of 17:42, 17 November 2024
| Attention: Warning | ||
|---|---|---|
| These instructions are not intended for laser users. They help the PoCs to remember what to do. |
Lasercutter Calibration Procedures
Safety warning: For calibration, it is necessary to deactivate the sensors of the hatch. Therefore, wearing safety glasses is mandatory. Do not calibrate the laser with persons without safety glasses in the space.
Calibration works well using sticky notes attached to the mirror mounts. The laser output is to be set to 20%. The laser is fired manually (1-3 seconds) until a burn pattern becomes visible on the sticky note. There were always two burn marks when we calibrated (Why?). The first calibration started with the mirror next to the laser tube, then moved toward the cutting area.
- The laser spot is not circular: The most probable cause is the mirror directly above the lens.
Links:
- http://wiki.fablab-karlsruhe.de/doku.php?id=maschinen:lasercutter:wartung:kalibration
- https://github.com/nortd/lasersaur/wiki/optics_setup
- https://github.com/nortd/lasersaur/wiki/Calibrating-mirrors-and-lenses
Upper nut for laser focus
When polishing the lens, the nut which holds the end of the laser emitter can be rotated, this means that it is hard to find the optimal distance so that the acrylic spacers work properly
After the most recent lens polishing, the ring was placed at 3 different rotations (with the screwhole for the compressed air tube always aligned with the flagt section of the 'neck' of the laser emitter assembly
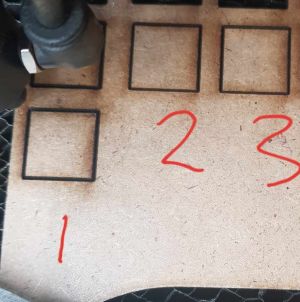
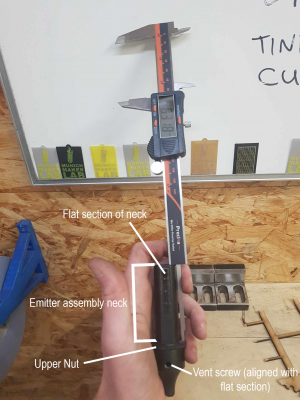
Of the 3 cuts (see figure 1) , 2 looked cleanest, here, 1 is the first position of the upper nut of the emitter, 2 is one 360 rotation downward so that the screwhole is aligned again) and 3 is another full rotation. Taking out the emitter assembly and measuring the top of the neck to the top of the upper nut, the 3 distances from the cuts 1,2 and 3 were:
1 - 62.4mm
2 - 63.2mm
3 - 64mm
See figure 2 for how this measurement should look and how the nut and emitter head are assembled.


