Bambulab P1S: Difference between revisions
No edit summary |
No edit summary |
||
| Line 2: | Line 2: | ||
|name = BambuLab P1S + AMS | |name = BambuLab P1S + AMS | ||
|status = working | |status = working | ||
|image = | |image = BambuLab_P1S.jpg | ||
|description = BambuLab P1S + AMS | |description = BambuLab P1S + AMS | ||
|owner = MuMaLab | |owner = MuMaLab | ||
Latest revision as of 14:27, 17 October 2024
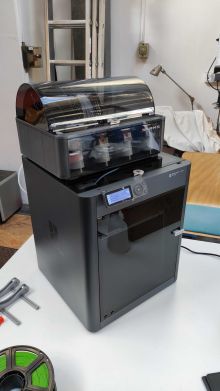
| BambuLab P1S + AMS Status: working [box doku] | |
|---|---|
| |
| Description | BambuLab P1S + AMS |
| Owner | MuMaLab |
| Financing | Bought from official Vendor (€877) |
| Build Volume | 256x 256x 256 mm (11.8 x 11.8 x 15.7 in) |
| Nozzle | 0.4 mm stainless steel |
Two years after the last poll in which the Artillery Sidewinder was selected to bridge the gap, a new series of reliable and fast printers with advanced features has finally arrived. Responding to the demand for a faster, enclosed printer capable of printing materials beyond PLA, we've introduced the Bambulab P1S to the lab. This addition will enable us to complete a wider variety of projects in a shorter time frame. You should be able to finish your project 2 to 4 times faster in comparison to the more traditional machines.
Details
A fast corexy- based FDM Printer for 1.75mm Filaments. Integrated with varoius sensors and auto-calibration features.
- Enclosed-body for high-temperature filament printing
- Vibration Compensation & Extrusion Compensation
- Up to 16-color printing with AMS
- Up to 20000 mm/s² acceleration, prints a benchy in 18min
- Built-in camera for remote monitoring and timelapse
- Multi-Color Capable with the 4 Color AMS
- All-Metal Hotend, Direct Drive, Filament Runout Sensor, Filament Cutter.
- Integrated Activated Carbon Filter
- Ideal: PLA, PETG, TPU, PVA, PET, ABS, ASA, Capable: PA, PC
- For Flexible Filamet like TPU please use exteral mount on the back instead of the AMS.
- 100-240 VAC, 50/60 Hz, 1000 W @220 V, 350W@110V
The machine has been setup to use LAN only mode. LAN Mode is a feature that allows Bambu Lab printers to work in a local area network, and communicate with the slicer for sending files and monitoring without requiring internet access. The following features are not avaliable under this mode:
- Cannot start prints remotely from outside the local network
- Bambu Handy app is not available when using LAN Mode.
- Print History feature is not available
Quickstart guide
Software
In order to use the machine, it is recommended to use the official Bambu Studio from Bambulab or the Orcaslicer community fork. Both software are itself a open source fork from Prusaslicer, and avaliable on all platforms (Windows, Mac, Linux). Although other slicer could also be used and the machine also uses standard Gcode, they lack the presets for the machines and also some machine specific commands dedicated for some of this machines unique features.
Please download and install the slicer on your local machine. The slicer operates similarly to PrusaSlicer but includes some unique features and UI changes. All your familiar settings are available, and most of your PrusaSlicer knowledge will transfer.
Slicing and Printing
Select the Bambulab P1S printer preset and choose the Textured PEI Plate as the plate type. You are now ready to slice! Remember to select the correct filament type in the filament section. If you are using the AMS, insert your filament into the AMS and configure it by following the AMS Introduction.
To send the files to the printer, you have two options: either use the small micro SD card on the top front side of the printer and export your sliced files directly to it, or connect to the machine via WLAN and send the files wirelessly. The latter option also allows you to monitor the print via the slicer itself. To connect to the machine wirelessly, please follow the Connecting to the Printer guide under Machine Operation section.
For more information about machine operation, filament loading/unloading, and more, please refer to the Machine Operation section or visit the Bambulab official wiki for detailed instructions. If you have any questions, feel free to ask in the #3d_printing channel on slack or message @Spacezhang.
Official Guides
The Official Bambulab Wiki has some really nice and extensive documentation
- The P1 Series Introduction to the machine itself
- The AMS Introduction to the AMS Multimaterial System
- The Bambu Studio Introduction to the slicer used by the machine.
And here is the manual to the printer: [Link]
Machine operation
Connecting to the Printer
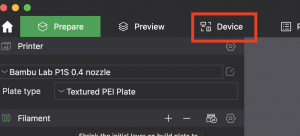
- Go to the printer page in Bambu Studio
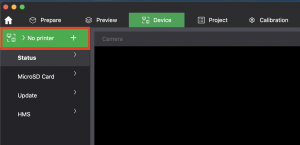
- Click on "No Printer" to open the dropdown
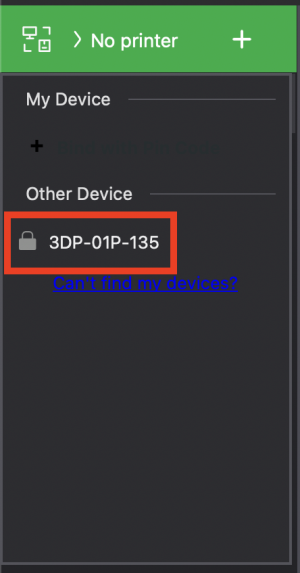
- Select the only printer that shows up.
If it doesn't show up make sure the printer is switched on and restart Bambu Studio.
- Enter the access code you can get from the printers settings
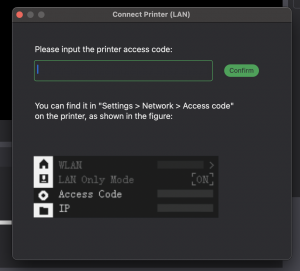
And that's it! You should be able to run calibration for your filament, send a print and watch it with the webcam now. Beware that this *should* only work from the munichmakerlab WiFi.
Calibrating your own filament
If you bring non-bambu filament you'll probably have to calibrate it first. For this you'll need the official Bambu Studio slicer as calibration does not appear to work with Orcaslicer.
To do that you'll have to connect to the printer as described above. After that you'll go over to the calibration tab and run the calibrations listed in there.
Your K Factor (used for pressure advance) should end out at about 0.02 and the flow multiplier at around 0.95.
Insert / Unload filament
Check out this page. (The AMS is already set up)
Slicing and Starting the print
Give this video a watch. Make sure to select the P1S in the settings.
Suggestions and Feedback
Do you have any suggestions or feedback in regard to the printer, its maintenance and its current status?
Please write your comments below!
- [Comment]
