Prusa i3 MK3S: Difference between revisions
Jump to navigation
Jump to search
No edit summary |
No edit summary |
||
| (One intermediate revision by the same user not shown) | |||
| Line 14: | Line 14: | ||
== Details == | == Details == | ||
* Avaliable print Surface: | * Avaliable print Surface: | ||
** Double-sided Textured PEI Powder-coated Spring Steel Sheet | ** Double-sided Textured PEI Powder-coated Spring Steel Sheet | ||
** Spring Steel Sheet With Smooth Double-sided PEI | ** Spring Steel Sheet With Smooth Double-sided PEI | ||
* Printable via SD Card | * Printable via SD Card (SD Card reader is provided) | ||
* Possible Material: | * Possible Material: PLA (Recommended) PETG, (ASA), (ABS), PC, CPE, PVA/BVOH, PVB, HIPS, PP, Flex, Nylon | ||
** For now, please ask the #3d_printing channel in Slack until the detailed rules are worked out. | ** For now, please ask the #3d_printing channel in Slack until the detailed rules are worked out. | ||
| Line 31: | Line 29: | ||
* Use the official presets for the Original Prusa i3 MK3S. | * Use the official presets for the Original Prusa i3 MK3S. | ||
* Get the SD Card that's in the printer, export to the SD Card (a SD Card reader can be found on the 3D printer shelf), and put it back into the printer. | * Get the SD Card that's in the printer, export to the SD Card (a SD Card reader can be found on the 3D printer shelf), and put it back into the printer. | ||
* Make sure that the bed sheet you are using is set on the settings. We have a textured and a smooth PEI sheet for this printer. Put the one you need onto the printer and select it on the menu: Home Screen - Settings - HW Setup - Select either "Sheet Smooth1" or "Sheet Textur1" (see picture beside). | * Make sure that the bed sheet you are using is set on the settings. We have a textured and a smooth PEI sheet for this printer. Put the one you need onto the printer and select it on the menu: Home Screen -> Settings -> HW Setup -> Select either "Sheet Smooth1" or "Sheet Textur1" (see picture beside). | ||
* Verify that you're about to start the right print - the display shows an image preview of your model | * Verify that you're about to start the right print - the display shows an image preview of your model | ||
Latest revision as of 10:06, 6 January 2024
| Prusa i3 MK3S Status: working [box doku] | |
|---|---|

| |
| Description | Original Prusa i3 MK3S |
| Owner | Terry (@Terry Kidd) |
| Build Volume | 250 × 210 × 210 mm (9.8 × 8.2 × 8.2 in) |
| Nozzle | 0.4 mm brass |
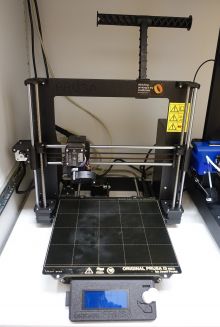
We recently recieved a Original Prusa i3 MK3S lended to the space by Terry. It is fully functional now, however we still need to discuss on the rules around using this machine since we want to make sure the lended machine stays healthy.
- Please bring your own filament and only use plain PLA.
- For advanced user other filament can be considered. Please see the details section for more information.
Details
- Avaliable print Surface:
- Double-sided Textured PEI Powder-coated Spring Steel Sheet
- Spring Steel Sheet With Smooth Double-sided PEI
- Printable via SD Card (SD Card reader is provided)
- Possible Material: PLA (Recommended) PETG, (ASA), (ABS), PC, CPE, PVA/BVOH, PVB, HIPS, PP, Flex, Nylon
- For now, please ask the #3d_printing channel in Slack until the detailed rules are worked out.
Usage
If you haven't used the printer, register for the monthly 3D printing intro course or ask in the 3d_printing channel on Slack beforehand.

- Slice your .stl in PrusaSlicer
- Use the official presets for the Original Prusa i3 MK3S.
- Get the SD Card that's in the printer, export to the SD Card (a SD Card reader can be found on the 3D printer shelf), and put it back into the printer.
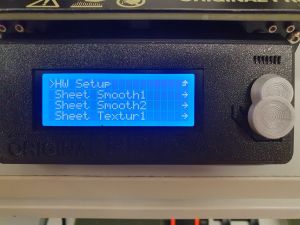
- Make sure that the bed sheet you are using is set on the settings. We have a textured and a smooth PEI sheet for this printer. Put the one you need onto the printer and select it on the menu: Home Screen -> Settings -> HW Setup -> Select either "Sheet Smooth1" or "Sheet Textur1" (see picture beside).
- Verify that you're about to start the right print - the display shows an image preview of your model
Specs & calibration
For filament testing please use this Filament Swatch Test to do:
- First Layer Calibration setup with different print bed
- Characterize print tolerance
Documentation
- Official assembly guide: Assembly Guide
- Maintainance guide: Maintanance guide
Printer repair & maintanance log
- 26.11.2023 Machine fully serviced (rebuilt hotend/extruder, fixed X axis, recabled) by q3k and spacezhang
- 02.1.2023 Machine arrived at Lab
- 10.12.2022 Machine first inspection and maintanance
- Regular maintanance done to the printer, as well as fixed some minor issues.
- 10.12.2022 PTFE Tube in the machine broke, replacement ordered. The machine is temporarly unavaliable.
